ISO 9606-1 & ISO 9606-4 Welder Qualifications
The steps and screenshots shown here are for ISO 9606-1, but the process is similar for ISO 9606-4.
Step 1 - Select the standard & enter the qualification details
- Select the standard. ISO 9606-1 WPQs can be created in metric units only;
- Click here to continue;
- Select a welder ID. The name, email, company and photograph will be displayed for the selected welder;
- If the welder is previously qualified to the standard selected, this section will appear with the "Clone" button. You can pick any of the previous WPQs (the dropdown box will list the designations of the WPQs) and press the clone button to copy all the data from the other qualification, which you may then edit;
- Enter the date of birth, place of birth, identification number, method of identification and employer. Please note that in the 2017 version of ISO 9606-1 all these fields are mandatory;
- The WPS selected will appear here. The workflow for creating a WPQ from a BYO WPS and WPS created in WeldTrace are different. Please check the relevant articles about these two methods. Enter a number for the WPQ, pick a revision and the date;
- Pick the qualification type, the job knowledge test outcome, acceptance criteria, place of testing, test date and the issue date. All these fields are mandatory;
- Select yes, if the WPQ will expire or no if it will not expire;
- If the qualification is set to expire then select 2 or 3 years for expiry from the test date. If the qualification is set to not expire, you will see these 3 options for the revalidation method;
Step 2 - Enter the joint details and process variables
- If there are other WPQs for the standard selected, this section will appear with the "Replicate" button. You can pick any of the previous WPQs (the dropdown box will list the designations of the WPQs) and press the replicate button to copy the data from the other qualification (from this point down i.e. starting from the joint details), which you may then edit;
- Enter the parent material specifications for both the base metals, pick the group and sub-groups from the drop down box;
- Select the product type (product form), joint type and branch (if the product type is pipe), additional joint type test option, test piece thickness and pipe OD if applicable;
- The tab to enter the variables for process 1. The current tab will be highlighted. You may add another process (maximum 3 processes per WPQ) by clicking on the plus button;
- Pick the welding process, position and the other variables. Mandatory fields for the selected process will be enabled and will have a red asterisk. The fields that are not relevant for the selected process will be disabled;

The validity of the WPQ will commence from the date entered in the "Test Date" field (the date on which the welder qualification test was conducted) and not the date entered in the "WPQ Date" field
The “Clone” and “Replicate” functions will only transfer the data from WPQs that are in “Awarded” state. Any of the “Failed” or “In progress” WPQ designations will not be shown for selection
Step 3 - Test Results
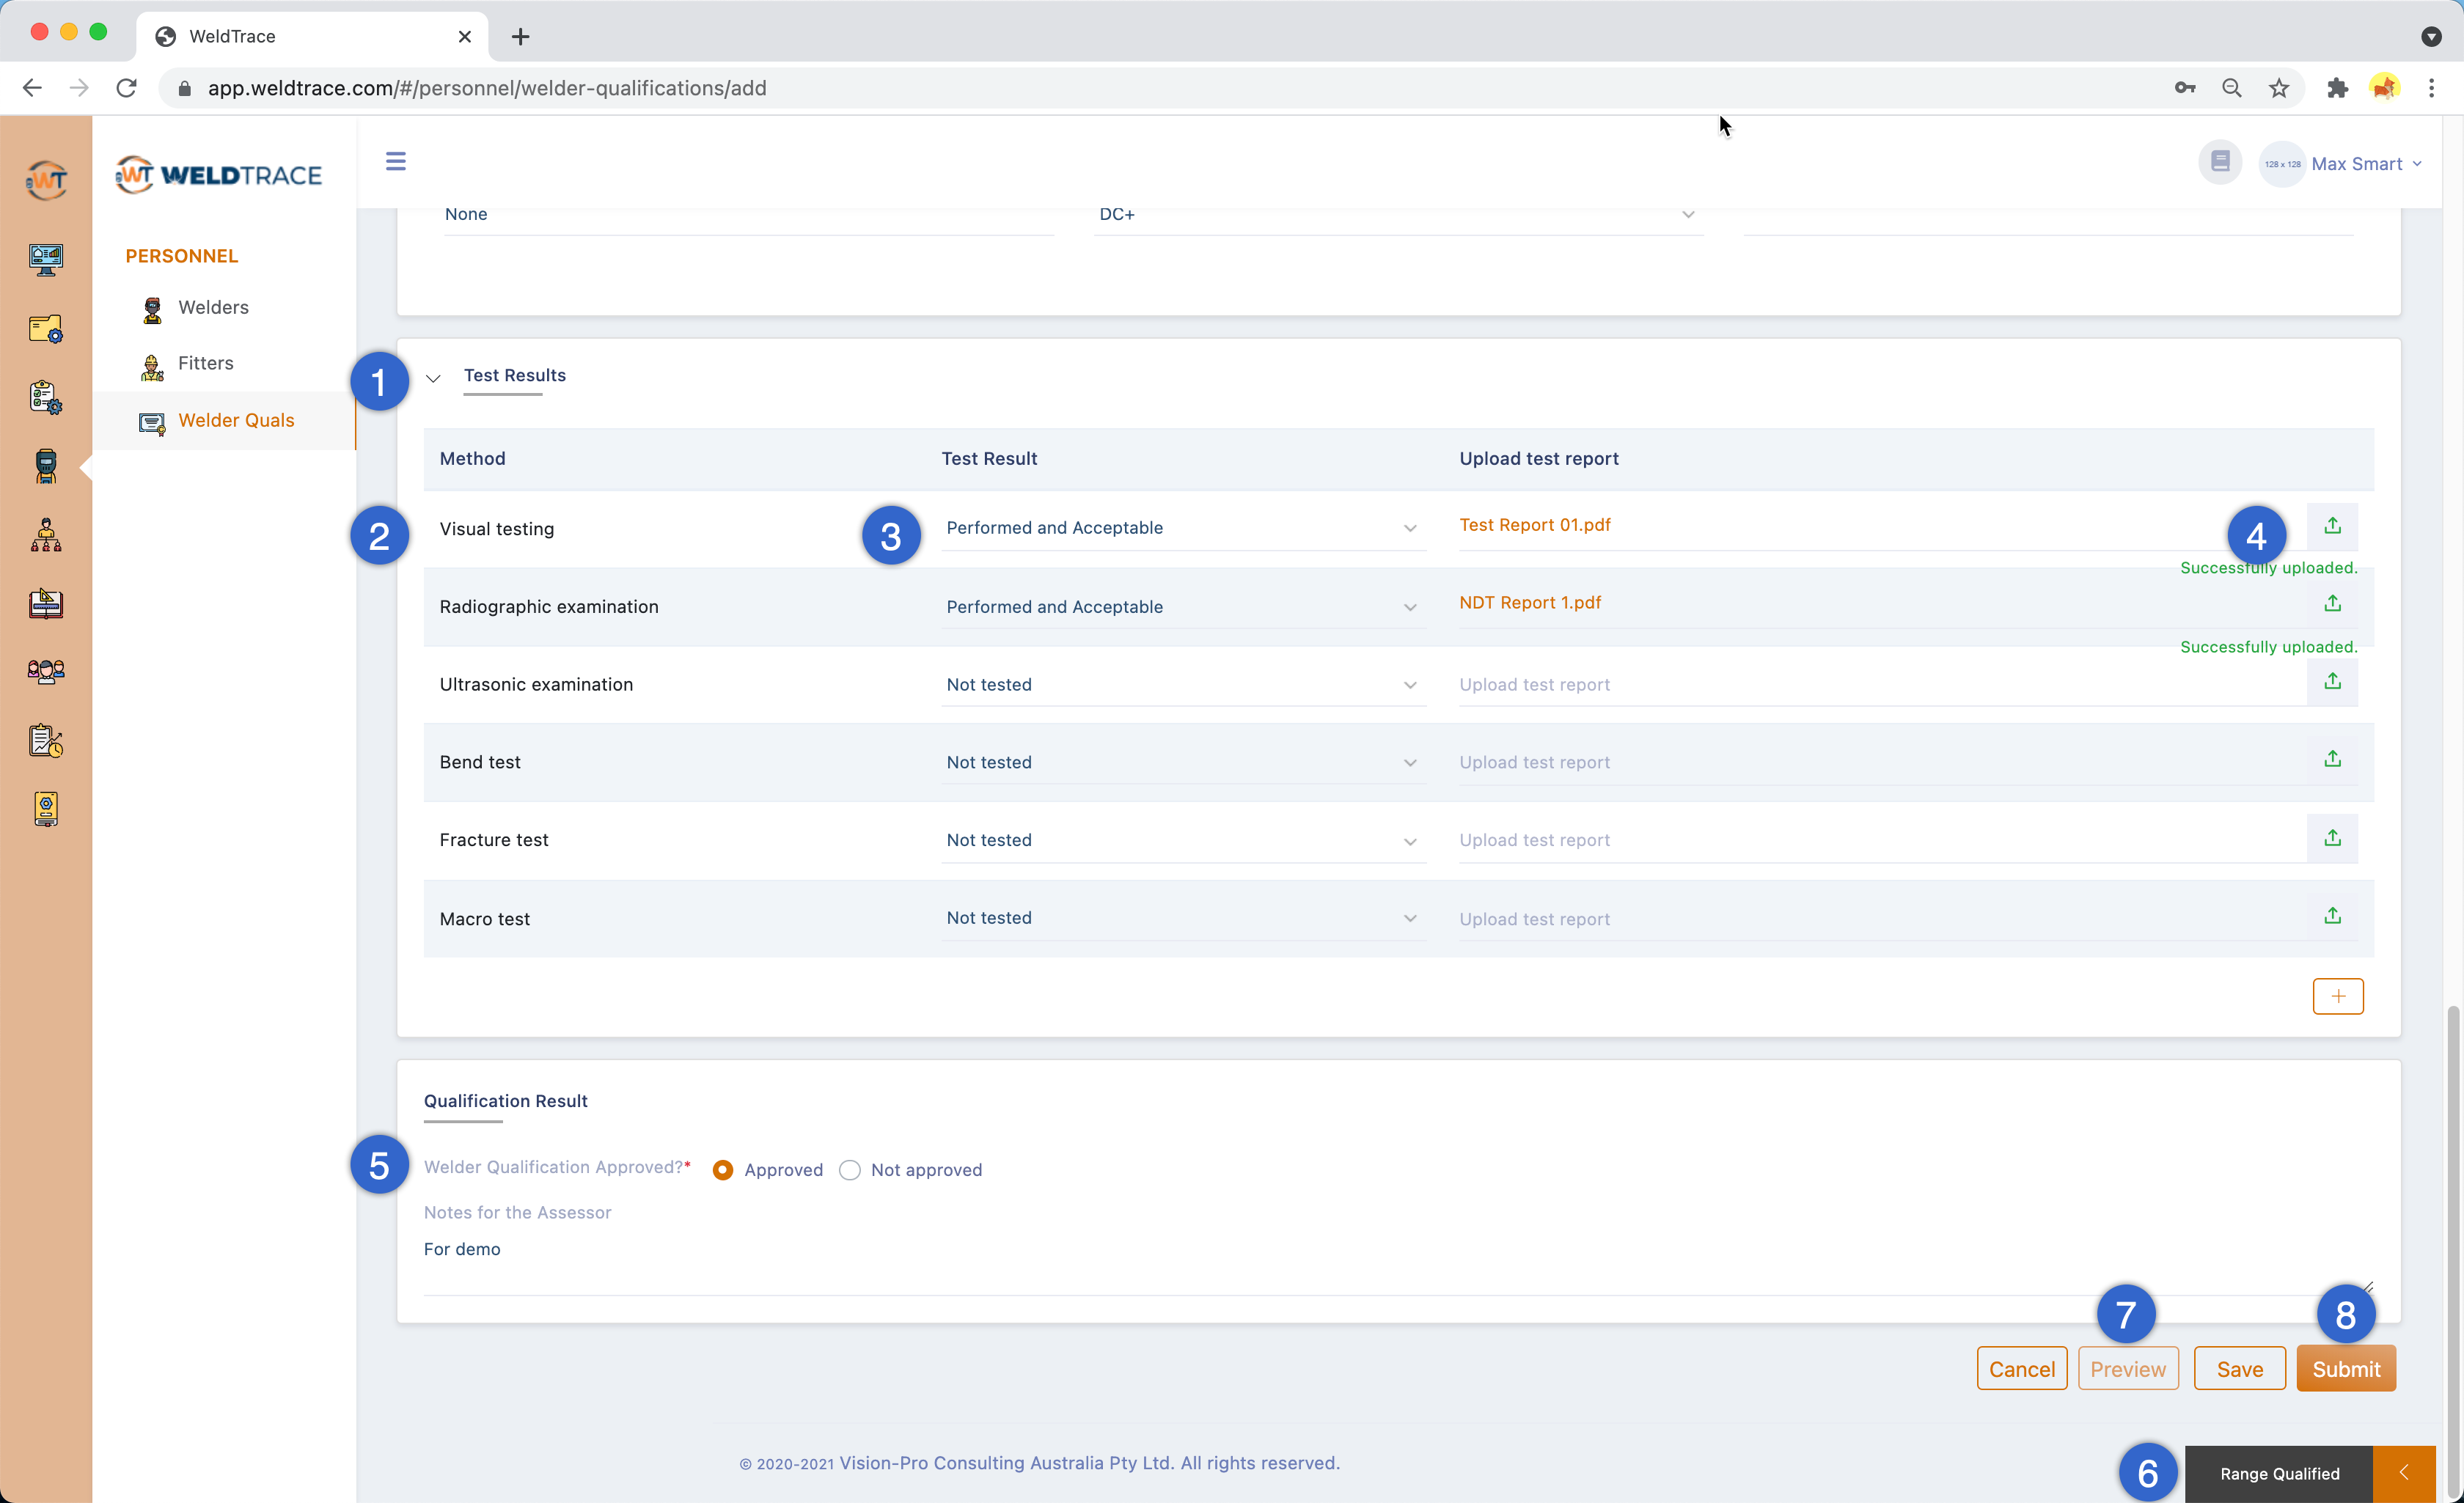 Test results for ISO 9606-1 welder qualification
- Enter the test results in this section;
- The test methods displayed here will be based on the joint type, test position, deposit thickness and other criteria;
- Select “Performed and Acceptable” if the test result is acceptable. If “Not Tested” or “Not Acceptable” are selected for the required tests, the WPQ status will default to “Not Approved” – please see (5);
- You may upload the test report (must be a PDF file);
- Select the outcome of the welder qualification test. If “Not approved” is selected, the outcome of the process will be a failed WPQ (this can be changed in the approval process - the next step in the workflow);
- You can click on this button to slide out the range qualified values table at any time (see next step);
- Preview will generate the WPQ (this button will be enabled after you save the WPQ);
- Save button will save the WPQ and you may continue to edit and the Submit button will save and push the WPQ to the next stage of the workflow;
Range Qualified Values
- The range qualified values will be displayed in this table;
- The values shown in the columns below will be for the processes displayed here;
The test methods listed include both required and options tests
Step 4 - Approve the Welder Qualification
The welder qualification workflow is in two stages. Someone who has the privilege to access the menu can create a WPQ and submit it for approval. The same user or another user can approve and grant the qualification. Both these users' stamps and signatures will appear in the WPQ certificate.
The screenshot above is for viewing the welder qualification form that is showing the status "Awaiting Approval."
- Select “Yes” to grant the welder qualification. If the welder has failed any of the required tests, this will be set to “No”;
- You may leave the approval comments here;
- Click on “Submit” button to complete the process and generate the WPQ;
- The user may edit the WPQ, which will launch the WPQ edit process and all the fields will become editable. Please note that if the WPQ is edited it needs to be submitted and then approved. The WPQ certificate will then bear the stamp and signature of the user who edits the WPQ and not the user who first created the WPQ;
WPQ Certificate
- Designation – please see below on how to interpret it;
- Name and other information of the welder;
- Qualification details;
- The joint details with the information on base metals, product form and joint type;
- Thickness and range qualified values. Only the relevant numbers are displayed;
- Process variables;
- Range qualified values for process variables;
- The test reports uploaded will be stitched to the WPQ and the file names will be hyperlinked to the relevant page number;
- You can see the title page for test reports and the reports that are stitched to the WPQ in this preview window;
- The notes left by the user who created the WPQ and the user who approved it;
- The digital signature in the middle, the stamp at the left and the signature on the right are all put together automatically for the user who created the WPQ;
- Same as the point above and this set is for the user who approves the WPQ - as in this case, both can be the same person;
Designation (ISO 9606-1) - Example:
ISO 9606-1:2017 111 P BW FM1 15 s 16 t 16 D PF ss,nb ml
Standard (ISO 9606-1:2017)
Welding Process number only (111)
Product type - P for Plate and T for Pipe (P)
Type of weld – BW or FW (BW)
Filler material group (FM1)
Filler material type (15)
Dimensions – s, t and D (s 16 t 16 D -)
Welding position (PF)
Backing (single side, no backing - ss,nb)
Layer technique (multi layer - ml)
For multiple processes, the designation will look like this:
ISO 9606-1:2017 138/114/135 T BW FM4 S/T/U s 4/2/6 t 12 D 200 H-L045/PA/PC ss, nb ml/sl/ml
Welder Qualifications generated will be appended to the welder’s qualifications section

Go to the next article: AWS D1.1 Welder Qualification
Related Articles
ASME IX Welder Qualifications (WPQ or WQTR)
Create a new WPQ or WQTR for ASME IX Step 1 - Select the standard & unit Create a welder qualification - step 1 Select the standard; Select the unit (metric/US customary); Click here to continue; Select a welder ID; The name, email, company and ...Revalidation of Welder Qualifications
Revalidation Workflow for WPQs When a welder qualification is created in WeldTrace and is selected to go through a 2 or 3 year revalidation cycle as required in the ISO standards, such as ISO 9606-1, the info column in the welder qualifications list ...Welder Qualifications
Create code compliant welder qualifications You can create code compliant welder qualifications (WPQ - welder performance qualification or WQTR - welder qualification test record) in WeldTrace to ASME IX, AWS D1.1, ISO 9606-1 and API 1104. Welder ...Archive Welder Qualifications
Sometimes you may need to archive a welder qualification created in WeldTrace and make it unavailable for use. Make a welder qualification created in WT unavailable for use Click on this button to edit a WPQ created in WeldTrace; This slider button ...Understanding the Requirements of Documenting Welder Qualifications
Understanding Welder Qualification Requirements: A Comprehensive Guide to WPS-WPQ Documentation In the welding industry, proper documentation of welder qualifications remains one of the most critical aspects of ensuring safety, quality, and ...