Add Welders
You can add all your welders and their qualifications/certifications to WeldTrace. Welders who are employed by your contractor or another company may also be added to WeldTrace.
You can add one welder at a time or import a CSV (Excel) file and add the records for many welders at once. First let us look at adding one welder at a time and if you would like to check how to import a list of welders, scroll down this article and read this section: Import Welders List.
Add a Welder
- Enter the welder ID. This has to be unique e.g. the initials followed by a number, like WD1 – no duplicates allowed, minimum 2 characters, max 12, Special characters other than “-“ or hyphen are not allowed;
- Enter the full name of the welder (mandatory field);
- The welder's email address (optional). The welder will be notified via email of expiring qualifications if an email address is provided. These emails are CC'd to the Super User and Account Administrators;
- Welder's stamp number (optional);
- Name of the company the welder is employed by. Your company name will be shown here as default;
- If you click this button, you will be shown the list of contractors and you pick one or add a contractor;
- Pick the division, if applicable;
- You can create a division via this button;
- Upload a photograph of this person by clicking on the pen icon. You will be able to resize the image (see this article about uploading an image and resizing it - click here);
- If your account is in the Pro plan, you will see this row and you can check this box to give login access to the welder. Please check this article for more information on this feature - Login for Welders;
- Set the password;
- If you select this slider button, an email will be sent to the welder with their login details;
- Save the changes and close this interface;
Add Welder's Qualifications
Click on the welder ID in the welders list page and you will be navigated to the welder's detail page.
- Click on the "+" button to add a BYO WPQ or WQTR. You may also create a WPQ or WQTR with the code compliant templates in WeldTrace. Check this article to learn more about that process: Welder Qualifications
- You may click here to edit the welder's details;
- Select the WPS from this dropdown box. The WPS must be already entered into the WPS section (read this article about adding a WPS - click here) or created in WeldTrace;
- The data in this row (process & type for root, fill and cap passes) will be taken from the WPS and displayed here. These cannot be changed;
- The standard and the units for the WPS will be shown here. This cannot be changed;
- The other data in the WPS such as joint type, position, P number and thickness or diameter range qualified values will be shown and they can be edited and changed;
- Enter the WPQ number;
- Select a revision number. The WPQ and revision number combination must be unique;
- Pick a date for the welder qualification;
- Enter a report number (optional);
- You may pick a filler metal F number and edit the thickness and diameter ranges;
- Upload the WPQ file in PDF format and save;
To edit the welder's qualifications, check this article: Edit a Welder's Record.
Import Welders List
Click on the "Import CSV File" button in the welders list page and you will be taken to this page:
- Import welders list page;
- Download the template file;
- The downloaded file will appear in the browser's downloads area;
- Once you populate the data, click on this button to import the csv file;
Populate the csv template
Refer the following tables for the list of acceptable values for each standard:
ASME IX
| JOINT TYPE | PRODUCT FORM | POSITION | P NUMBER | F NUMBER |
Groove | Pipe | F | 1 thru 15F, 34, 41 thru 49 | 1 |
Fillet | Plate | F, H | 21 thru P‐No. 26 | 1, 2 |
HFOL | F, H, V | 51 thru 53, 61 & 62 | 2, 1 with backing | |
CROL | V | 1 thru 15F, 34, 41 thru 49 & 21 thru P‐No. 26 | 1 - 3 | |
Plug/Slot | F, H, OH | 1 thru 15F, 34, 41 thru 49 & 51 thru 53, 61 & 62 | 3, 1-2 with backing | |
STUD | F, V, OH | 21 thru 26 & P‐No. 51 thru 53, 61 & 62 | 1 - 4 | |
F, H, V, OH | 4, 1-3 with backing | |||
5, 1 | ||||
5, 1 with backing | ||||
6 | ||||
21 - 26 | ||||
31 | ||||
32 | ||||
33 | ||||
34, 41 - 46 | ||||
35 | ||||
36 | ||||
37 | ||||
34, 41 - 46 | ||||
51 - 55 | ||||
56 | ||||
61 | ||||
71 | ||||
72 |
AWS D1.1
JOINT TYPE | PRODUCT FORM | POSITION | P NUMBER | F NUMBER |
Groove | Pipe | F | I | 1 |
Fillet | Plate | F, H | II | 2 |
Box tube | F, H, V | III | 3 | |
V | IV | 4 | ||
F, H, OH | - | 5 | ||
F, V, OH | 6 | |||
F, H, V, OH | 7 | |||
8 |
Note: Use the AWS D1.1 Group values in the P Number column.
ISO 15614-1
JOINT TYPE | PRODUCT FORM | POSITION | P NUMBER | F NUMBER |
| Butt | Pipe | F | 1 | FM1 |
| Fillet | Plate | F, H | 2 | FM2 |
| F, H, V | 3 | FM3 | ||
| V | 4 | FM4 | ||
| F, H, OH | 5 | FM5 | ||
| F, V, OH | 6 | FM6 | ||
| F, H, V, OH | 7 | |||
| 8 | ||||
9 | ||||
10 | ||||
11 | ||||
- |
Note: Use the ISO 15608 Group values in the P Number column.
API 1104
JOINT TYPE | PRODUCT FORM | POSITION | P NUMBER | F NUMBER |
| Butt | Pipe | F | 42 | 1 |
| Fillet | F, H | 50 | 2 | |
| Branch | F, H, V | 60 | 3 | |
| V | A | 4 | ||
| F, H, OH | BM | 5 | ||
| F, V, OH | BN | 6 | ||
| F, H, V, OH | BQ | 7 | ||
| BR | 8 | |||
| X42 | ||||
| X46 | ||||
| X52 | ||||
| X56 | ||||
X60 | ||||
X65 | ||||
X70 | ||||
X80 |
Note: Use the API 5L Grade values in the P Number column.
For all the other standards you may use any of the acceptable values given in the four tables above. WeldTrace currently accepts these: AS/NZS 1554.1, AS/NZS 1554.3, AS/NZS 1554.5, AS/NZS 1554.6, AS/NZS 1665, AS/NZS 3992, ASME B31.1, ASME B31.3, ASME B31.4, ASME B31.8, AWS B2.1, AWS D1.2, AWS D1.5, AWS D1.6, AWS D9.1, BS 4515-1, BS 4515-2, EN 1011-2, EN 1011-3 and you can also use the text "Other" for the other standards.
Import CSV
- Enter the welder ID in column A and the welder's full name in column B (mandatory fields);
- Enter the welder's division in column C - if the company has multiple divisions or else leave it blank. If you enter a name here, it must match the name of the division already created under the "Organization - Division" section;
- Enter the welder's company name in column D if the welder works for one of your subcontractors or else leave it blank. If you enter a name here, it must match the name of the contractor already created under the "Organization - Contractor" section;
- Enter the WPS number and revision to which the welder is qualified to (must be already added to the WPS library or created in WeldTrace and approved) in columns H and I and the WPQ (welder qualification) number and revision in columns J and K. The report number is optional;
- The date of qualification or test date should be entered in column M in the account date format e.g. Apr-14-2021 or 14-Apr-2021;
- Fill in the joint type, product form, position, P number, F number, thickness and diameter range qualified values in the next few columns. Please refer the tables above for the acceptable values. The option for units is not shown here. The values stored against the WPQ will use the same set of units as the WPS (e.g. WPS that uses US Customary units will store the RQ values for the WPQ in US Customary units);
If you need to create multiple welder qualification records for a welder, copy the values in columns A to G for all the rows as shown in this screenshot.
Please note that t he column headings should not be edited and new columns should not be introduced.
If there are errors in the data
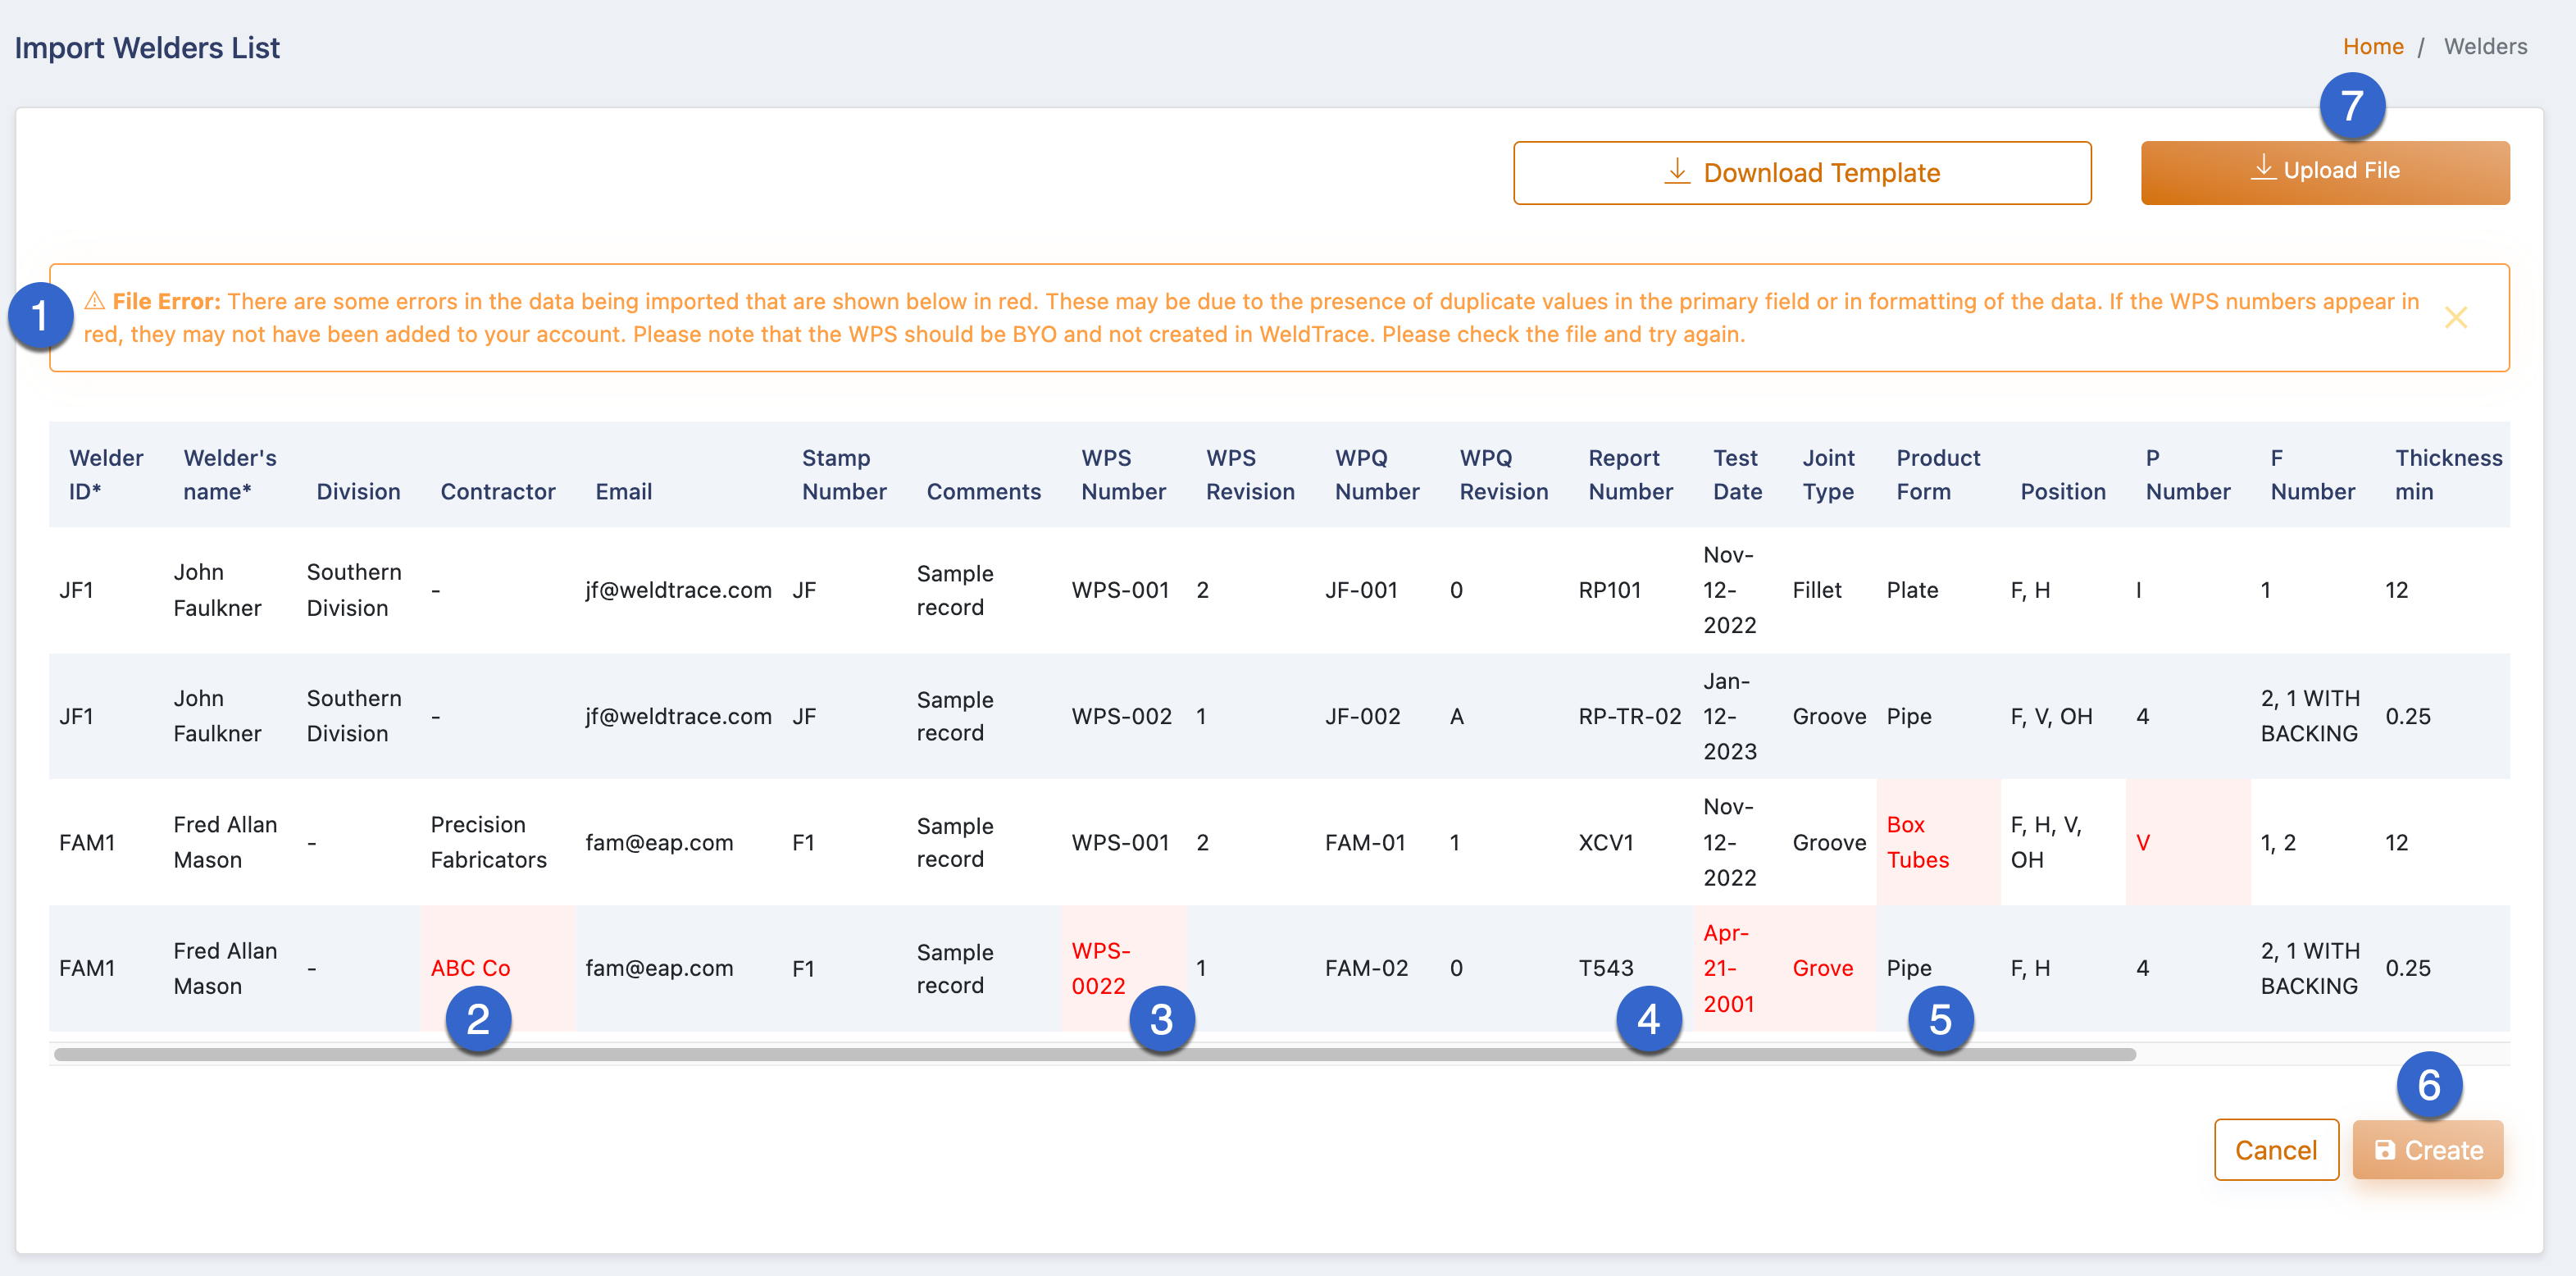 Imported welders data with errors
- If the data in the uploaded csv file cannot be imported, you will see this warning message;
- This cell is highlighted to indicate an error. In this case, a contractor by the name "ABC Co" has not been added to the "Organization - Contractor" menu;
- The error in this cell is due to a typo. This WPS number has not been added to the WPS library (either added as a BYO WPS or created in WeldTrace);
- The date added (please check the previous screenshot) was not in the correct format, even though the date appears to be correct;
- You may notice the typo and incorrect values that are highlighted as errors;
- The "Create" button will be disabled if there is any error in the data;
- You can fix the errors and try uploading again;
If there are no errors
- If there are no errors, you will not see any cells highlighted in red;
- The "Create" button will also be enabled;
Bulk File Upload
Please check this article for the bulk file upload process - Bulk File Upload. The welder qualification (WPQ) files must be in PDF format and they must be named like this: WelderID_WPQNumber_rev.pdf. The welder ID must be followed by the WPQ (WQTR) number and the revision with an underscore separating the welder ID, WPQ number and the WPQ revision.
New Welder Record
- Once the import process is completed, you will see new records created;
- All the data entered will be added to that welder's record;
- In this case, the imported csv file had data in two rows for this welder. So, two welder qualification data sets were created;
- Welder continuity records will also be automatically created (read the section below);
- You may edit and upload a photograph and upload the welder's WPQ files;
New Welder's Continuity Record
- This is the welder continuity report for the welder's records imported through the csv file;
- You can see that there are two different processes for which this welder is qualified to. So, two sets of records are shown for this welder;
- In this case, both the WPS had SMAW-manual process. So, for this process, both the WPQs are listed. Once the welder is used in a project and performs a weld to any of these processes, you will see data in the Project Number, Weld Number and Pass columns (you need to open the accordion to view these details). The date welded shown here is the test date of the WPQ;
Read the next article:
Edit a Welder's Record
Sample Data: You can download the sample welders template at the end of this article and import it to your trial account. This will give you some idea about the data import process in WeldTrace. Please change the test date in column M to a date within the last 6 months, so that the welder records that are created would not have expired for lack of continuity.
Related Articles
Welders
This knowledge base article is about adding and managing welders in WeldTrace. Welders list page All the welders in your account will be listed here. Click on a welder ID to view that welder's qualifications and other details of that welder; The ...Understanding the Requirements of Documenting Welder Qualifications
Understanding Welder Qualification Requirements: A Comprehensive Guide to WPS-WPQ Documentation In the welding industry, proper documentation of welder qualifications remains one of the most critical aspects of ensuring safety, quality, and ...Welder Qualifications Deeming from Formal Qualifications
WeldTrace will suggest whether a welder's existing qualification can be used for another WPS, based on the matching rules. The feature will help users review, assign, and manage deemed qualifications from the welder profile and then use those welders ...Login for Welders
If your account is in the "Pro" plan, you can give access to WeldTrace for any of your welders. Welders who are given login access will be able to use the WeldTrace mobile app and claim welds or update the weld data in the field. Edit Welder's ...Edit a Welder's Record
You can edit a welder's records at any time. However, there are some conditions for editing a welder's WPQs. Edit a welder's details Edit a welder's qualifications You can replace the photograph (or add a photo if there is none) of this welder by ...